Robot Art Show
The goal of this project was to learn about coding and circuitry. We did this by partnering up and moving through three phases at our own pace, each gaining more complexity. The first of these phases involved simple alligator clips, light bulbs, and a battery. The first segment gave us a basic idea of how a circuit works, and you can alter the flow of electricity. The next part involved, again, making circuits, but this time we'd be using breadboards, which you can see a picture of below. Using the breadboards alongside a multi-meter allows for the investigation of the relationship between voltage, current, and resistance, which I'll go into down below. The final learning piece in this project was our introduction to the coding language of Arduino. We learned Arduino by moving through 16 premade circuits, each with their own code. After making our way through the 16 circuits, we were free to pursue whatever kind of coding project we wanted. After a few heated debates, my partner and I decided on making our Arduino play the Star Wars Theme Song, which we did successfully.
Pictures
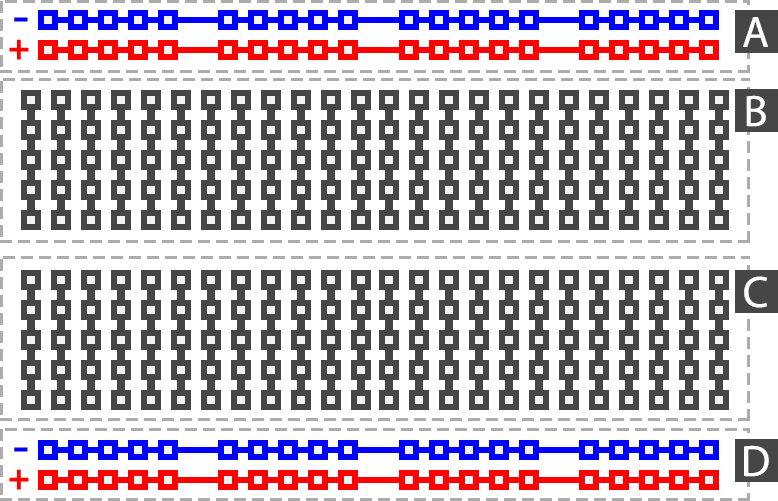
You can see on this picture where you can plug things in, and what each port is connected to. The current can only flow through where the lines designate.
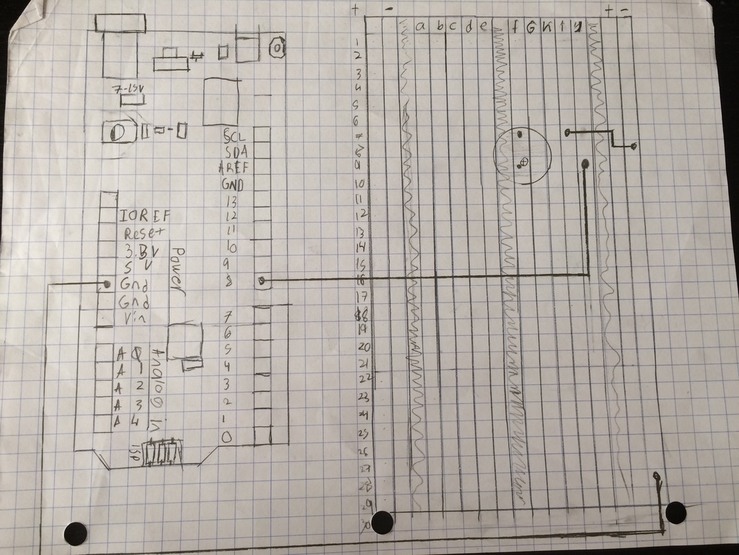
This is a representation of what our circuit looks like in real life. The lines are wires, which are plugged in where the dots are, and the circle is the buzzer, which plays the notes, and the dots inside the circle are the plugs for the buzzer.
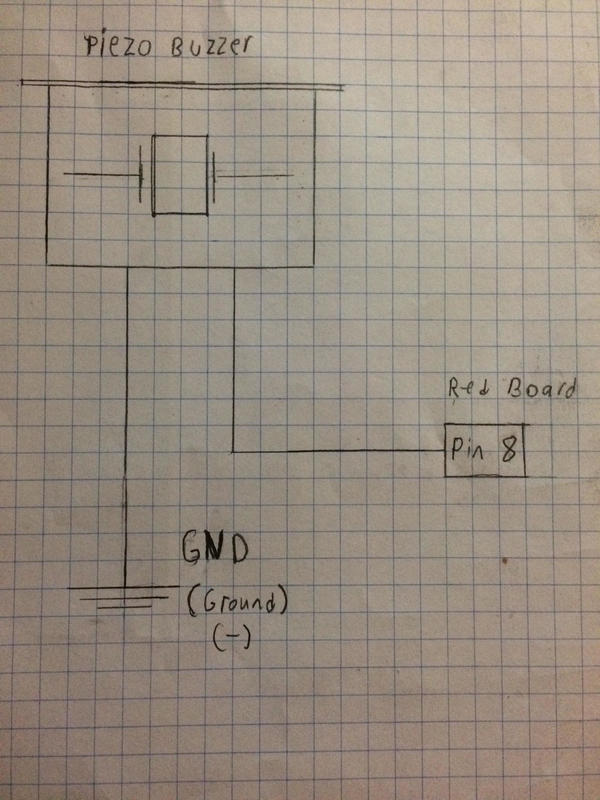
This is what is called a circuit diagram, which portrays the same information as the diagram above, just in a slightly different way. If you start at the GND pin in the first picture, it goes to the buzzer, and then a wire comes out of the other side of the buzzer, and current flows to Pin 8. Now, if you look at the circuit diagram, you can see the exact same information displayed. Using a circuit diagram is useful to make it easier to see the flow of current, where the actual picture of the board is more useful when trying to actually recreate the circuit.
Concepts
Circuit: A loop of conductive material from one battery terminal to the other
Series: A circuit in which resistance is arranged in a chain, as so that the current has only one path to take; The circuit for our project was in a series, since there was only one path for the current to go
Parallel: A circuit that has two or more paths for current to flow through
Resistance: The amount of slowing of current through an obstacle; Variable - r; Unit - Ω (Ohms); Equation in Series - r1+r2+r3+...; Equation in Parallel - 1/r1+1/r2+...=1/Answer
Current: Flow of charge/electricity through the circuit; Variable - i; Unit - A (Amps);
Equation - i=V/r
Voltage: The potential energy difference from one side of a component to the other; Variable - V; Unit - V (Volts); Equation - V=ir
Power: The amount of flow with a potential energy difference; Variable - P; Unit - W (Watts); Equation - P=Vi
The Code Behind It
You can find a link here to see the code that I wrote with comments to give you an idea of how we can get our buzzer to play Star Wars.
The Product
Reflection
This project, although it started off quite slow, ended up being one of the most fun projects we've done all year. One of the reasons why I feel like I did exceptionally well was because we were working in pairs, which meant that everything was between you and your partner. Also, almost everything in this entire project is taught to us via us setting up a circuit and trying to figure out why it works like it does, which forces a kind of responsibility on everyone to make sure that they're understanding everything, because the only person you have helping you is your own partner. I feel like this mindset helped push me beyond the amount of work I was putting in on previous projects. However, there's always room for improvement, and that area of improvement for me during this project was definitely the willingness to push through the things I don't find as interesting as my partner. This became evident when I started falling behind on the first two segments, but he powered through them, because he found them fun. But once we reached the coding portion of the project, he started to slow down and got bored quickly every class period. But on the other hand, finally reaching the coding section got me back up and running, and I took off at lightning speed, and just as my partner was having fun during the first segments, it became my turn to have fun doing the work. This did however lead me to not actually ever telling my partner what I was doing, so he fell farther and farther behind, but eventually I realized the situation he was in and caught him back up, but I'd like to be able to recognize when my team needs help before they actually fall behind. In the end, my partner and I were able to successfully come together and make a buzzer play Star Wars, so I'd say it was worth it.
